Dental 3D Printing
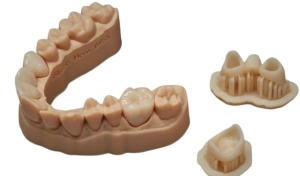
Among the 3D printing applications, 3D printing is gaining popularity in the field of dentistry. 3D printing in dentistry is a manufacturing tool that can create products according to the needs of each patient. Crowns and bridges used in 3D printing in dental treatment because they are used to replace missing teeth. Resin 3D printing can be used to make temporary, high-precision, and beautiful 3D printed crowns and bridges. All these works are done in our facility.
Dental 3D printing has revolutionized various aspects of dentistry, from creating dental models and prosthetics to producing custom implants. Here’s an overview of the key aspects of dental 3D printing:
- Applications:
- Dental Models: 3D printing is used to create accurate physical models of a patient’s teeth and gums, which are valuable for treatment planning and communication with patients.
- Prosthetics: Crowns, bridges, dentures, and other dental prosthetics can be 3D printed to achieve precise fits and personalized solutions.
- Surgical Guides: 3D printing is employed to create surgical guides for implant placement, ensuring precise and accurate positioning during surgery.
- Orthodontic Appliances: Customized orthodontic devices, such as clear aligners, can be produced through 3D printing.
- Materials:
- Resin: Dental 3D printers often use biocompatible resins suitable for dental applications. These resins can be tooth-colored and are designed to meet the safety and regulatory standards for intraoral use.
- Metal: Some dental implants are 3D printed using metal materials, such as titanium, for their strength and biocompatibility.
- Digital Imaging:
- Dental 3D printing often starts with digital imaging, such as intraoral scans or CBCT (Cone Beam Computed Tomography) scans, to capture detailed information about a patient’s oral anatomy.
- CAD Software:
- Computer-aided design (CAD) software is used to design dental restorations or appliances. Dental CAD software allows for precise customization based on individual patient needs.
- 3D Printing Technologies:
- Stereolithography (SLA) and Digital Light Processing (DLP): These resin-based technologies are commonly used for producing detailed dental models and prosthetics.
- Selective Laser Sintering (SLS): This powder-based technology is suitable for producing dental bridges and other prosthetics using materials like nylon.
- Fused Deposition Modeling (FDM): Although less common, FDM technology can be used with certain biocompatible filaments for applications like surgical guides.
- Post-Processing:
- After printing, dental objects may undergo post-processing steps such as cleaning, curing, and, in the case of metal components, additional finishing processes.
- Regulatory Compliance:
- Compliance with dental and medical regulations is crucial. Dental laboratories and practitioners must adhere to standards to ensure the safety and efficacy of 3D-printed dental products.
- Customization and Patient-Specific Solutions:
- One of the significant advantages of dental 3D printing is the ability to create highly customized solutions tailored to individual patient needs, leading to improved treatment outcomes.
Dental 3D printing continues to advance, offering more efficient and cost-effective solutions for various dental applications.
3D Printed Hip Joint (Medical Purpose)
Three-dimensional(3D) printing offers significant potential as an efficient fabrication technique on human organs as it is capable of biomimicking the Complex designs found in nature. The determining factors for hip replacement and the different fabrication techniques such as direct 3D printing, Fused Deposition Modelling (FDM), Selective Laser Sintering (SLS) and stereolithography (SLA) for hip replacement. We can make all different kind of hip joints, and its 3D printing in our facilities.
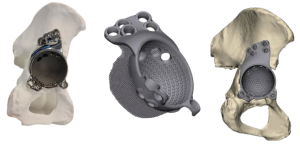
Creating a 3D model of a hip joint for 3D printing can be a complex task, and it generally involves a combination of medical imaging, computer-aided design (CAD) software, and knowledge of anatomy. Here’s a general outline of the steps involved:
- Obtain Medical Imaging Data:
- Obtain medical imaging data such as CT (Computed Tomography) or MRI (Magnetic Resonance Imaging) scans of the hip joint. These scans provide detailed information about the anatomy and structure.
- DICOM to STL Conversion:
- Convert the medical imaging data (usually in DICOM format) to STL (Stereolithography) format, which is commonly used in 3D printing. There are various software tools available for this purpose.
- Segmentation:
- Use specialized software to segment the STL file, separating the hip joint from the surrounding tissues. This step involves identifying and isolating the specific structures of interest.
- CAD Modeling:
- Import the segmented data into a CAD software, where you can further refine the model. CAD tools allow you to smooth surfaces, correct errors, and make adjustments for 3D printing considerations.
- Support Structures:
- If needed, add support structures to the model. Support structures are temporary structures that help prevent overhangs and ensure the successful printing of complex geometries.
- Export the Model:
- Export the finalized 3D model in a format suitable for your 3D printer. Common formats include STL or OBJ.
- 3D Printing:
- Load the exported file into your 3D printer’s slicing software. Adjust printing parameters such as layer height, infill density, and print speed based on the specific requirements of your printer and the desired quality of the print.
- Post-Processing:
- Once the 3D print is complete, remove any support structures and perform post-processing as needed. This may include sanding, painting, or other finishing techniques.
It’s important to note that creating accurate anatomical models for medical or educational purposes should be done with attention to detail and accuracy.